
In this tutorial, you’ll learn how to build an ESP32 web server to serve files from a microSD card using a microSD card module that communicates using SPI protocol. You’ll learn how to serve your HTML, CSS, JavaScript files, images, and other assets saved on the microSD card. This can be especially useful if your files are too big to fit on the filesystem (SPIFFS), or it can also be more convenient depending on your project. To build the web server, we’ll use the ESPAsyncWebServer library.

If you want to build a web server with files from SPIFFS, follow the next tutorial instead:
To show you how to build a web server with files from a microSD card, we’ll build a simple HTML page that displays some text formatted with CSS. We’ll also serve a favicon. The following image shows the web page we’ll serve:


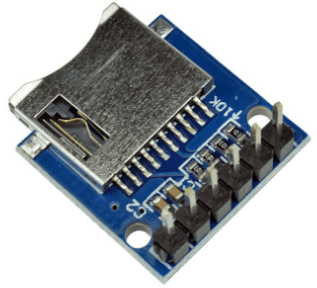
There are different microSD card modules compatible with the ESP32. We’re using the microSD card module sown in the following figure – it communicates using SPI communication protocol. You can use any other microSD card module with an SPI interface.

You can click the link below to check different stores where you can get the microSD card module:
The microSD card module communicates using SPI communication protocol. We’ll use the default ESP32 SPI pins as shown in the following table:
| microSD card module | ESP32 |
| 3V3 | 3.3V |
| CS | GPIO 5 |
| MOSI | GPIO 23 |
| CLK | GPIO 18 |
| MISO | GPIO 19 |
| GND | GND |
Recommended reading: ESP32 Pinout Reference: Which GPIO pins should you use?
Before proceeding with the tutorial, make sure you format your microSD card as FAT32. Follow the next instructions to format your microSD card or use a software tool like SD Card Formater (compatible with Windows and Mac OS).
1. Insert the microSD card in your computer. Go to My Computer and right click on the SD card. Select Format as shown in figure below.

2. A new window pops up. Select FAT32, press Start to initialize the formatting process and follow the onscreen instructions.

After formatting the microSD card, you can paste the files used to build the web server there. We’ll move the index.html, style.css, and favicon.png files into there. Follow the next section to get your files.
Create a file called index.html with the following content:
<!DOCTYPE HTML><html>
<head>
  <meta name="viewport" content="width=device-width, initial-scale=1">
  <link rel="stylesheet" type="text/css" href="style.css">
  <link rel="icon"  type="image/png" href="favicon.png">
  <title>ESP Web Server</title>
</head>
<body>
  <h1>Hello World!</h1>
  <p>This page was built with files from a microSD card.</p>
</body>
</html>
Create a file called style.css with the following content:
html {
    font-family: Arial;
    text-align: center;
}
body {
    max-width: 400px;
    margin:0px auto;
}
We’ll also serve a favicon. It is a png image with 15×15 pixels. You can use the same favicon as ours, or your own icon, or none favicon at all.
You can click on the following link to download the favicon:
After having all files prepared, open the microSD card directory and paste the files.


For this tutorial you need the following parts:
You can use the preceding links or go directly to MakerAdvisor.com/tools to find all the parts for your projects at the best price!

Wire the microSD card module to the ESP32 as shown in the following schematic diagram. We’re using the default ESP32 SPI pins.

Copy the following code to your Arduino IDE.
/*
  Rui Santos
  Complete project details at https://RandomNerdTutorials.com/esp32-web-server-microsd-card/

  Permission is hereby granted, free of charge, to any person obtaining a copy
  of this software and associated documentation files.

  The above copyright notice and this permission notice shall be included in all
  copies or substantial portions of the Software.
*/

#include <Arduino.h>
#include <WiFi.h>
#include <AsyncTCP.h>
#include <ESPAsyncWebServer.h>
#include "FS.h"
#include "SD.h"
#include "SPI.h"

// Replace with your network credentials
const char* ssid = "REPLACE_WITH_YOUR_SSID";
const char* password = "REPLACE_WITH_YOUR_PASSWORD";

// Create AsyncWebServer object on port 80
AsyncWebServer server(80);

void initSDCard(){
  if(!SD.begin()){
    Serial.println("Card Mount Failed");
    return;
  }
  uint8_t cardType = SD.cardType();

  if(cardType == CARD_NONE){
    Serial.println("No SD card attached");
    return;
  }

  Serial.print("SD Card Type: ");
  if(cardType == CARD_MMC){
    Serial.println("MMC");
  } else if(cardType == CARD_SD){
    Serial.println("SDSC");
  } else if(cardType == CARD_SDHC){
    Serial.println("SDHC");
  } else {
    Serial.println("UNKNOWN");
  }
  uint64_t cardSize = SD.cardSize() / (1024 * 1024);
  Serial.printf("SD Card Size: %lluMB\n", cardSize);
}

void initWiFi() {
  WiFi.mode(WIFI_STA);
  WiFi.begin(ssid, password);
  Serial.print("Connecting to WiFi ..");
  while (WiFi.status() != WL_CONNECTED) {
    Serial.print('.');
    delay(1000);
  }
  Serial.println(WiFi.localIP());
}

void setup() {
  Serial.begin(115200);
  initWiFi();
  initSDCard();

  server.on("/", HTTP_GET, [](AsyncWebServerRequest *request){
    request->send(SD, "/index.html", "text/html");
  });

  server.serveStatic("/", SD, "/");

  server.begin();
}

void loop() {

}
Insert your network credentials in the following variables and the code should work straight away:
// Replace with your network credentials
const char* ssid = "REPLACE_WITH_YOUR_SSID";
const char* password = "REPLACE_WITH_YOUR_PASSWORD";
We’ve covered how to build a web server with the ESP32 in previous tutorials. So, we’ll just take a look at the relevant parts for this tutorial.
First, make sure you include the FS.h, SD.h and SPI.h libraries to be able to communicate with the microSD card and handle files.
#include "FS.h"
#include "SD.h"
#include "SPI.h"
The initSDCard() function initializes the microSD card on the default SPI pins.
void initSDCard(){
  if(!SD.begin()){
    Serial.println("Card Mount Failed");
    return;
  }
  uint8_t cardType = SD.cardType();

  if(cardType == CARD_NONE){
    Serial.println("No SD card attached");
    return;
  }
  Serial.print("SD Card Type: ");
  if(cardType == CARD_MMC){
    Serial.println("MMC");
  } else if(cardType == CARD_SD){
    Serial.println("SDSC");
  } else if(cardType == CARD_SDHC){
    Serial.println("SDHC");
  } else {
    Serial.println("UNKNOWN");
  }
  uint64_t cardSize = SD.cardSize() / (1024 * 1024);
  Serial.printf("SD Card Size: %lluMB\n", cardSize);
}
Then, you need to call this function in the setup():
initSDCard();
When you access the ESP32 IP address on the root (/) URL, send the HTML file saved on the microSD card.
server.on("/", HTTP_GET, [](AsyncWebServerRequest *request){
  request->send(SD, "/index.html", "text/html");
});
The first argument of the send() function is the filesystem where the files are saved. In this case, it is saved in the SD card (SD). The second argument is the path where the file is located /index.html). The third argument refers to the content type (text/html).
When the HTML file loads on your browser, it will request the CSS and the favicon files. These are static files saved on the same directory (SD). We can add the following line to serve static files in a directory when requested by the root URL. It serves the CSS and favicon files automatically.
server.serveStatic("/", SD, "/");
If your web server needs to handle more routes, you can add them to the setup(). Don’t forget to set SD as the first argument to the send() function. This way, it will look for the files in the microSD card.
It’s as simple as this. This can be applied to any other web server project.
After uploading the code, open the Serial Monitor at a baud rate of 115200. Press the on-board RST button.
You should get something similar on the Serial Monitor: the ESP32 IP address and information about the microSD card.

Open a browser on your local network and paste the ESP32 IP address. It will load the following web page with the files saved on the microSD card. Notice the favicon on the web browser title bar.

Copyright ©2025. All Rights Reserved Emblab THE RAVE INNOVATION
